5 Tips for Amazing Photos Using a Phone! (Plus Download a Free Preset!)
It’s so important to capture imagery to stay connected with your consumer and audience in between your professional sessions. As a business owner, to keep your digital marketing relevant and relatable, knowing how to use your most accessible tool, your camera on your iPhone, is key!
When you know how to take GREAT photos using your phone, you have the ability to craft quality content to share online, not a flat mediocre image that detracts from your brand.
These 5 tips for cell phone photography will help you take more beautiful images that stand out from the crowd and elevate your branding.

1. Take Advantage of Your Camera Settings
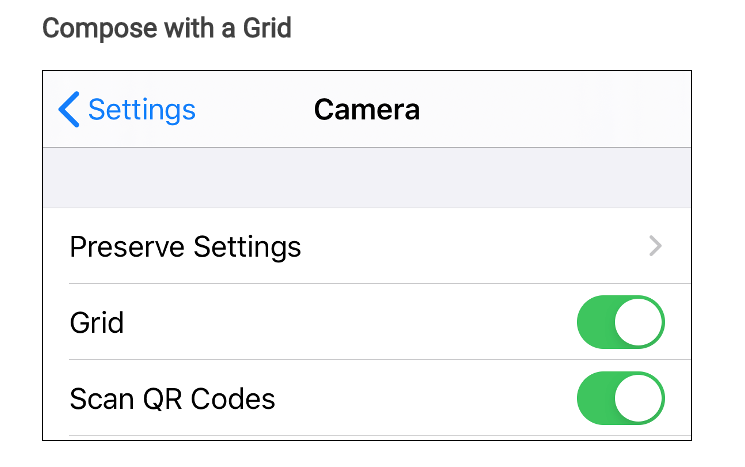
Use your camera’s built-in grid to make it easy to follow the Rule of Thirds, a composition principle meaning images are most visually appealing when divided into thirds both horizontally and vertically.
A grid will not only help you create photo that’s not crooked, but it will also help you with balance and proportion (especially when shooting a flat lay) so that your images are beautifully composed and pleasing to the eye.
- To turn on your iPhone’s camera grid, to go Settings > Camera > Grid and select On.
- Place the subject matter in one of the intersection lines of your grid and it automatically looks better!
2. Lighting is Key (Turn Off Your Flash!)
Do not use your flash. I repeat, do NOT use a flash! A flash will cause your image to look flat, over-exposed, washed-out, and unnatural (aka ghost face!)
Natural light is wonderful for iPhone photography. Indoors, choose a spot with indirect, but bright natural light coming in from one side (to the left or right, not head-on). This will create depth and life in your photo so it really pops!
Outdoors, it’s best to shoot early in the morning or in the early evening. In the middle of the day, look for a spot with some nice shade, especially when shooting a face (you don’t want people to have to squint!)
If you don’t have enough “good” light, your image will look grainy and unprofessional, so avoid shooting at night if you can.

3. Shoot From the Proper Angle
The angle can make or break a photo. You want to find the right perspective to show the depth and grandness in your image
- For shooting images of food, the safest angles are straight on and at a 45-degree angle, or overhead (flat lay.)
- To make an object appear large and prominent, shoot from below looking up.
- Landscapes, buildings and interior shots look great taken straight on or from below.
- The most flattering angle for headshots is shooting from slightly above
- Warning! iPhones can be prone to distortion when your photo is taken too close up, especially when shooting headshots. Give yourself about arms-length and adjust as necessary.
4. Set Your Focus with 1 Tap
This is so important to achieve crisp images. Set your exact focal point by tapping on the subject on your screen, whether that’s a face, a designer handbag, or a juicy hamburger.
With an iPhone, tapping on your subject will also automatically adjust the exposure settings so your image isn’t too dark or too bright.
Pro tip: you can manually adjust your exposure before shooting. When you tap on your focal point, a yellow sun icon with slider bar will appear. Slide the bar up or down to create the brightness you like.
For iPhone 8 Plus and newer, take advantage of Portrait Mode for that coveted blurry background that looks like you used a DSLR camera.
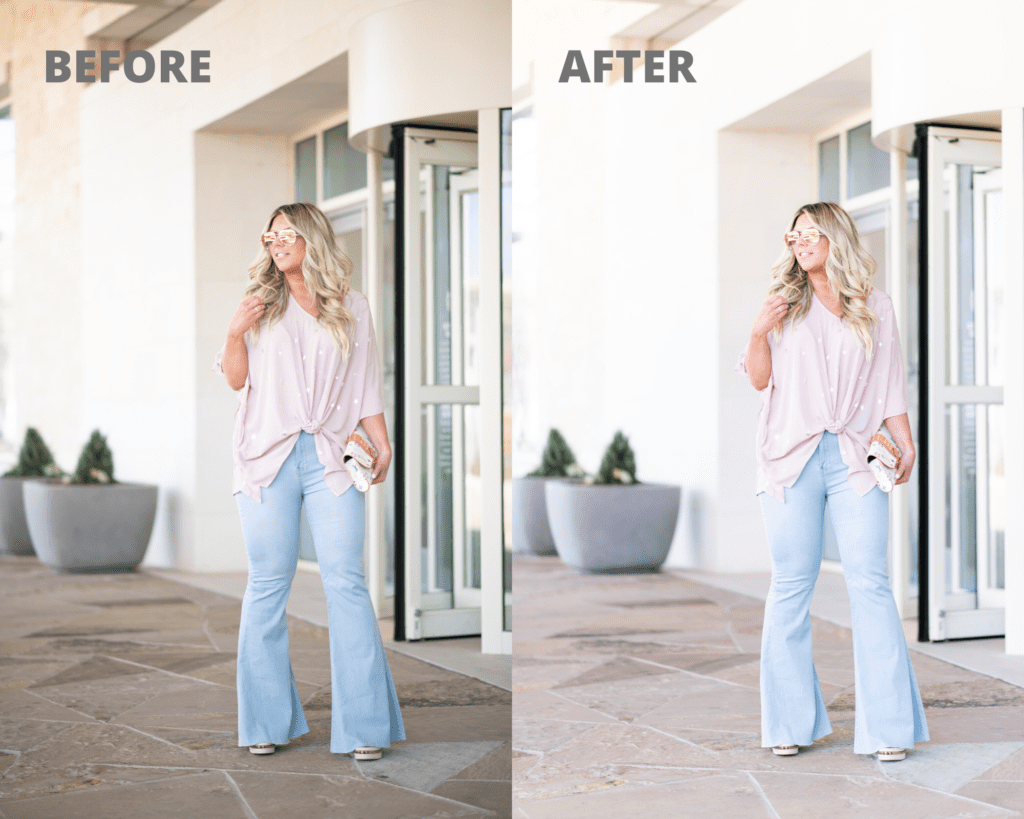
Image captured of The Fabulous Kristi of Likes of A Blonde
5. Use a Mobile Preset (Free Download!)
You captured your images. Now what? Now’s the time to really make them stand OUT. You can really elevate the look and feel with editing.
I highly recommend the app Lightroom (it’s free!) and grabbing some mobile presets. Lightroom makes it EASY to adjust the lighting and color balance of your photo.
But don’t spend all day working on getting the right edit from scratch. Use a preset! Lightroom mobile presets will save you time and help you get the look and “mood” you crave in your photos with just a few taps! Whether it’s light and airy, or dark and glam, there’s a preset that fits your style and aesthetic.
As a GIFT to you, I’m offering a free download of my brand new Lightroom Desktop & Mobile Preset, Lovely Light!
Click here to download the Lovely Light Mobile Preset
Click here to download the Lovely Light Desktop Preset
For more Lightroom presets that are LAUNCHING SOON, be sure to subscribe to the BLOG so you won’t’ miss them!!
Have FUN with your iPhone photography and go make your life EASIER with presets 🙂
HOW TO USE THE FILES
1: Unzip the Files
The first thing you will need to do is unzip the folder of presets that you downloaded. You can easily do this on a computer. On a PC, just right-click on the zipped folder and choose “Extract All” from the menu of options. On a Mac, just double-click the file and Mac’s unzipping utility does the rest.

If you need to do this step on a phone, you will need to download the WinZip app (iOS app or Android app) to your phone. Open the unzip app on your mobile phone and while in it locate the zip file on your device. Opening the files will unzip them.
Step 2: Save the Presets
If you unzipped the presets on your computer, you will need to save the preset files to your favorite cloud storage options so you can access them on your mobile phone. You will also need to be able to allow access to those files on your phone through that same cloud storage app.
If you are doing this process on your mobile phone, you will want to make sure you have saved the unzipped the presets on your phone.
Step 3: Open the Lightroom Mobile App
This step is really easy. Just open your free Lightroom app. Once its open, you can add the DNG/Preset files (next step).
Step 4: Add the DNG/Preset Files
To add a preset, click on the (…) Settings option in the top-right corner of the app.
Choose the Add Photos option.
On the next screen, choose the location you will be pulling your DNG/Preset files from. If you have saved them to your phone, choose “From Camera Roll”. If you have saved them to a cloud storage option, choose “From Files”.
NOTE: Preset files are DNG files. When you initially open the image, you may get an error that says, “Cannot Load File”. This is normal. Press the check mark in the corner anyway.
Step 5: Create Lightroom Presets from the DNG Files.
Click on one of the newly imported files, then click on the three dots inside a circle in the upper right-hand corner of the screen. From there, choose “Create Preset” from the menu that appears.
Give your preset a name. We recommend to type the same name that is on the front of the preset image (to keep things simple).
You should also put the preset in a Preset Group. By default, it will be in the User Presets group. Creating a new group with your new collection’s name will keep the presets from each collection together.
Do these same steps for each DNG/preset file.
Save this on Pinterest:
Leave a Reply Cancel reply
Hi! I'm Audrie
I'm a professional Influencer + Brand Photographer and Marketing Strategist that curates content to elevate your online and social media presence that results in an increase in sales.
investment
influencer + Brand Management
Categories
shop AD Looks & Guides
Click Here For Free Branding Session Packing List
Shop my LTK
view more
YOU CAN ALSO FIND ME HERE
Let's get to know one another
Audrie built a reputable career as a photographer and marketing strategist. My favorite conversations are filled with truth bombs that focus on the grit of Entrepreneurship and the realities of marketing in today’s demand.
Thank you, Audrie! Excited to try your new preset!!
Thank you So much!! I am going to post a how to in just a bit to make the process a little bit easier for beginners so if you need those details stay tuned my friend!!
[…] Read the full blog post and download a free Lightroom preset HERE […]