How to Photograph in Manual Mode

I have been a Professional Photographer for 10 Years!! I remember starting out with my camera I would get so frustrated with all the buttons and to make sure I could at least get one good one I would just shoot in Auto. Auto was my security blanket but I finally spent hours working in manual mode to manipulate the light to get the best straight out of camera image I could. The better you capture straight out of the camera the less editing time and the more control you have of the end product that meets your style of photography. Here are a few tips on how I prefer to shoot in manual mode.
Lets talk manual mode when it comes to being a photographer. Manual mode gives you control over the shutter speed and aperture. It allows me to be creative and control my Nikon D850 and my Nikon Z7 camera, rather than having the camera do the work for me. Think of it as an automatic vs. a manual car. An automatic car is easy and self explanatory. You go from parked to drive with no steps in between. A manual car gives you complete control, you just have to know how to use a stick and shift between gears. The same goes for a camera.
Lets Go Back to the Basics
We need to understand a few things before we talk about shooting in manual mode. Knowing what each these things are help you adjust during a shoot.
Aperture: a space through which light passes in an optical or photographic instrument, especially the variable opening by which light enters a camera.
ISO: ISO relates to a camera’s sensitivity to light. A lower ISO setting makes the sensor less sensitive to light, meaning it either needs more illumination or a longer shutter speed to properly expose an image
Shutter Speed: Shutter speed is a measurement of the time the shutter is open, shown in seconds or fractions of a second: 1s, 1/2 s, 1/4 s … 1/250 s, 1/ 500 s, etc. The faster the shutter speed, the easier it is to photograph the subject without blur and “freeze” motion.
White Balance: Simply put, white balance in digital photography means adjusting colors so that the image looks more natural.
Kelvin: Kelvin represents the temperature of light. When you shoot in Kelvin, you are manually adjusting the camera’s white balance to match that of the Kelvin temperature in the room.
Why Would you Shoot in Manual Mode when Automatic Seems Easier?
After reading those definitions you’re probably wondering why in the world you would want to do something that seems so complicated! Well just like everything, practice makes perfect and it gets easier over time. Manual mode gives you total control and as a photographer it allows you to find your own personal style. I can alter an image to create the light and bright look that I like. Other photographers may like darker colors and mood so they adjust their settings in manual mode to do so.
Audrie’s Starting Point & Ideal Camera Settings:
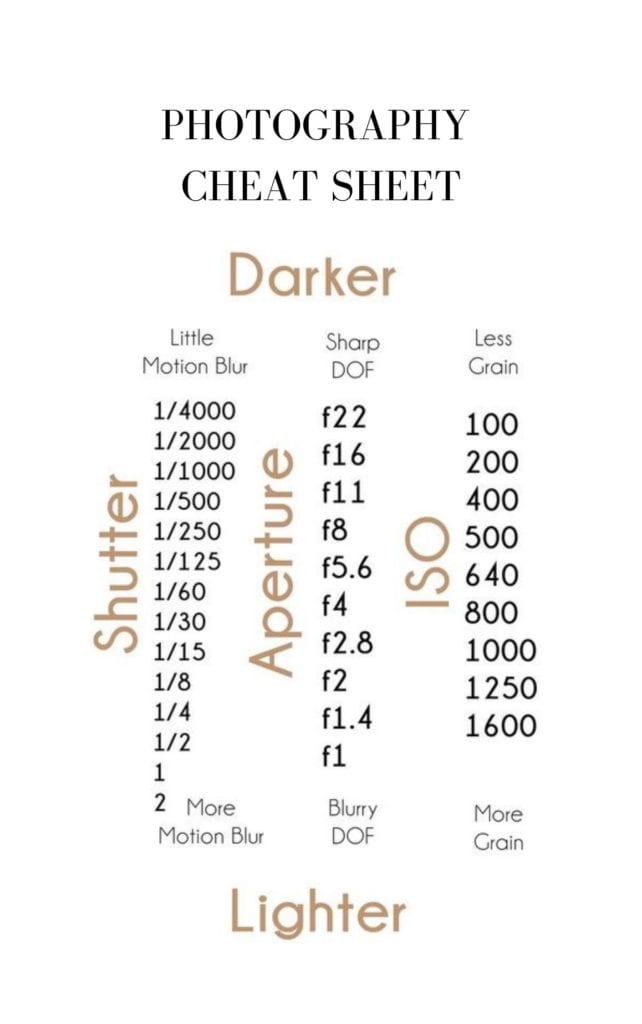
Shutter Speed: 200
ISO:100
Aperture: 2.2.
I always like to try and start out shooting in Auto/White Balance with cooler tones. If the location is dark, I will shoot in Kelvin. Reducing the number make the tones cooler. Increasing the Kelvin Number makes the colors warmer. I will lean towards the purple tone on the right pushing the dial lower instead of increasing the dial in the green tones. I find purple enhances the white cooler tones. This cheat sheet is perfect when you are just starting out and need some extra help to adjust your settings!

Lighting is Key
Lighting is key whether you shoot in manual mode or automatic. The camera is going to interpret the light whether it’s moody or bright. With a good light source, the camera will be able to illuminate the subject for clarity and dimension. Either mode you shoot in, lighting is very important. When in a dark space similar to that of a restaurant, your imagery will be moody and grainy. When in a well lit area with multiple windows and tones of white and lighter colors, your imagery will be bright and airy with less contrast. Another example is golden hour. We all use that term in photography. Golden hour is all about lighting as well. It’s perfect for family photos and gives the rich tones of the sun without heavily shadowing your subject.
Manual Mode allows a photographer to be creative while finding their own specific style. Today, every photographer has their own type of imagery they prefer. Whether its moody and dark or airy and light, it draws in a specific audience and allows a photographer to build a business off of it. Don’t sleep on manual mode!
I encourage you to watch the video below as I really get into detail of how to shoot in Manual Mode!
CAPTURE . BRAND. ENGAGE.
XOXO,
Audrie D.
PLEASE PIN THIS IMAGE FOR FUTURE REFERENCE
Leave a Reply Cancel reply
Hi! I'm Audrie
I'm a professional Influencer + Brand Photographer and Marketing Strategist that curates content to elevate your online and social media presence that results in an increase in sales.
investment
influencer + Brand Management
Categories
shop AD Looks & Guides
Click Here For Free Branding Session Packing List
Shop my LTK
view more
YOU CAN ALSO FIND ME HERE
Let's get to know one another
Audrie built a reputable career as a photographer and marketing strategist. My favorite conversations are filled with truth bombs that focus on the grit of Entrepreneurship and the realities of marketing in today’s demand.

[…] years of combined experience showing you one-on-one how to capture images in real time and in manual mode. We show you what those little buttons on your camera actually do. When shooting in RAW and in […]